How to migrate to Xtream-Masters OTT Panel
We move everything — users, lines, bouquets, streams, movies, series, categories, resellers and settings.
Migrate in 3 easy steps.
Tip: reinstall your server on Ubuntu 24.04 first
- Add your main server in the Master CMS Panel (xm: account) and wait for installation complete.
- Click Migrate Database button on master cms panel, then pick one option:
Option A — Remote Connection
When your old database is reachable.
- Enter your old database: host, port, name, user, password
- Pick your panel, then click Migrate
Option B — Database Backup File Recommended
- Export it from previous panel server:
mysqldump -u USER -p DB_NAME > backup.sql - Put it on the server as
/root/backup.sql(or.sql.gz) - Pick your panel, then click Migrate
- After Migration Success Message: Click MasterAdmin > Reset Admin Password
Optional: in master cms panel dashboard set your panel custom port, then login your Admin ID
Last step: bring servers online
- Manage Server: Edit the main server → set SSH password
- Manage Server: Click Main Server Option > Restart Service
- Manage Server: Edit each balancer → set SSH password
- Manage Server: Click LB Server Option > Re-install Balancer
How to change main server || Re-install main server
Your data stays safe. Back it up, set up the new server, then restore — users, lines, streams, movies, series and settings all come back.
Re-install in 4 easy steps.
Tip: install the new server on Ubuntu 24.04 first
- Back up your data — in your panel admin open Backup → click Generate Backup Now, then download the file from
/home/xtreamaster/backups/ - Set up the new server in the Master CMS Panel (xm: account):
- Delete the old main server
- Add the new server (or re-install its OS), then enter the SSH details
- Wait for installation to complete
- Restore your backup:
- Upload
backup.sql.gzto/home/xtreamaster/backups/ - Log in with admin / admin
- Open Backup → click Restore Backup
- Upload
- That’s it — if the main server IP changed, the panel updates it automatically.
Last step: bring load balancers online
- Open Manage Server
- For each balancer: click its option → Restart Service
- Wait up to 2 minutes for it to come online
How change panel port
- Login to Xtream-Masters CMS cPanel (ID: xm:********)
- In dashboard Click Edit Port Button
- Set New port Make sure not already used by any other service Then click Save button
- Approximately 2 minutes will take to apply changes and You all Done.
To change panel default port 7709
API Documentation & Integration Guide
Reseller API
Business IntegrationAutomate your reseller operations with our comprehensive API:
Admin Menu > Reseller Members > Members Group > Edit Reseller Group And Allow Reseller Use API.
Admin Menu > System Security > Access Codes > Create reseller api access code (end-point)
Reseller Menu > API Documentation > Create reseller api key.
Full Reseller API DocumentationAdmin API
Business IntegrationAutomate your admin operations with our comprehensive API:
- Create/manage client accounts
- Generate subscription links
- Handle admin access
Menu > Admin API > Create API KEY.
Menu > System Security > Access Codes Create admin api access code (end-point)
Full Admin API DocumentationPlayer API
End-User IntegrationIntegrate our streaming service with any player application:
- Retrieve content lists
- Get EPG data
- User Authentication
- Parental controls
ActiveCode API
End-User IntegrationIntegrate our streaming service with any player application:
- Retrieve content lists
- Get EPG data
- User Authentication
- Parental controls
API Best Practices
- • Rotate API keys quarterly
- • Implement proper error handling
- • Cache responses where appropriate
Protect Your Panel from DDoS and Brute Force Attacks
Most of the time, competitors launch attacks because they cannot compete with the quality you have achieved through hard work. As a result, they attempt to damage your service's reputation by doing attacks, To protect your panel follow below giving instructions.
-
Access Code Configuration:
- Log in to your admin panel
- Navigate to System Security > Access Code
- Enable both options:
- "Enable access code feature for panel logins"
- "Disable panel login page without access code link"
-
Create Admin Panel Code:
- Click Create New Code (top of page)
- Generate code using generate icon
- Configure settings:
- Type: Admin Panel
- Select admin groups
- Optional: IP restrictions
- Click Add
-
Reseller Panel Setup:
- Repeat admin process for reseller panel
- Best Practice:
- Create multiple codes for different reseller types
- Helps identify attack sources through targeted codes
-
Secure Mags Portal:
- Create Mac Access code:
- "Enable access code mags portal instead use default /c"
- Helps identify attack sources through targeted codes or if you don't use mac never share code with any
- Create Mac Access code:
-
Final Implementation:
- Copy generated access code links
- Distribute to authorized users:
yourdomain.tld:port/ac_XXXXXXX
- Direct
yourdomain.tld:portlogin disabled - Only valid access code links grant login access
- Brute-force attempts reduced by 90%+
- Enables precise attack source identification
By implementing these steps, you enhance your panel’s security and minimize exposure to malicious attacks.
Keep default /c MAC portal AND add a custom portal address
/c portal address is automatically disabled for security, and your MAC users connect through the custom address instead:
http://yourdomain.tld:port/abc
/c working and use a custom portal address at the same time. The panel does not enable both together — the custom address must be added by hand in the nginx config.
-
Open the portal config on the streaming server:
/home/x_m/bin/nginx/conf/portal.conf -
Add your custom portal path (here
abc— use your own code) so it maps to the same MAC portal as/c:# custom MAC portal address -> serves the same portal as /crewrite ^/abc/server/load.php$ /portal.php break;
rewrite ^/abc/portal.php$ /portal.php break;
location /abc/stalker_portal/c {
alias /home/xtreamaster/wwwdir/c;
}
location /abc {
alias /home/xtreamaster/wwwdir/c;
} -
Keep the default
/cENABLED:- Make sure the “disable default /c” block is NOT present (or is removed / commented out) in
portal.conf. That block looks like this:
# REMOVE / comment these lines to keep the default /c portal workingrewrite ^/portal.php$ /invalid.html break;
location /c {
access_log off;
deny all;
}Why: the panel inserts this disable block automatically when you create a portal access code, which is what blocks/c. To have both the default/cand your custom/abc, this block must be gone. - Make sure the “disable default /c” block is NOT present (or is removed / commented out) in
-
Test the config and reload nginx (no downtime):
sudo /home/x_m/bin/nginx/sbin/nginx -t
sudo /home/x_m/bin/nginx/sbin/nginx -s reload -
Both portal addresses now work:
http://yourdomain.tld:port/chttp://yourdomain.tld:port/abc
Add a custom MAC portal address while keeping default /c
- Edit
portal.confon each streaming / load-balancer server that serves the MAC portal — it is a per-server file. - Do not use a reserved word (e.g.
c,portal,player,server,stalker_portal) as the custom path — it shadows core nginx locations and breaks the portal. - Keeping the default
/copen reduces the security benefit of access codes — only do this if you really need backward compatibility for existing MAC devices. - If the panel re-generates
portal.conflater (e.g. you add or remove an access code in the UI), re-apply this manual change.
Install Xtream-Masters OTT Panel On Existing OS without reinstall it.
-
Backup MySQL Data
- Create complete database backups
- Download backup files to your local PC
- Do not proceed without verified backups
-
Remove Existing MySQL Server
# Execute these commands in sequence:
sudo service mysql stop
sudo apt-get --force-yes remove mysql-server mysql-client
sudo apt-get --force-yes purge mysql-server mysql-client
sudo apt-get --force-yes remove mysql-common -y
sudo apt-get --force-yes purge mysql-common -y
sudo apt-get --force-yes autoremove --purge -y
sudo apt-get autoclean
sudo rm -rf /etc/mysql
sudo rm -rf /var/lib/mysql
sudo rm -rf /var/log/mysql
Copy all commands carefullyThis will completely remove MySQL and all associated data. Ensure backups exist before proceeding. -
Install Panel
- Enter server SSH details in Master CMS panel
- Initiate installation process
- Verify installation finish
Swap Link Feature Explained
-
Initial Setup:
- Configure backup re-stream links in the Swap Link section
- These remain inactive until needed
-
Activation:
- When local streams fail (entire category down)
- Navigate to Streams > Advanced Streams Tool > Swap Stream Source
-
Execution:
- Select affected category
- Click to swap to backup source
- System instantly exchange stream source and swap links
-
Restoration:
- After fixing local stream issues
- Return to same swap tool
- Revert to original stream source
- Swap operates at category level - all channels in category switch together
- Backup links should use different infrastructure than primary
- Empty swap link won't effect just ignore and stream source will keep remine
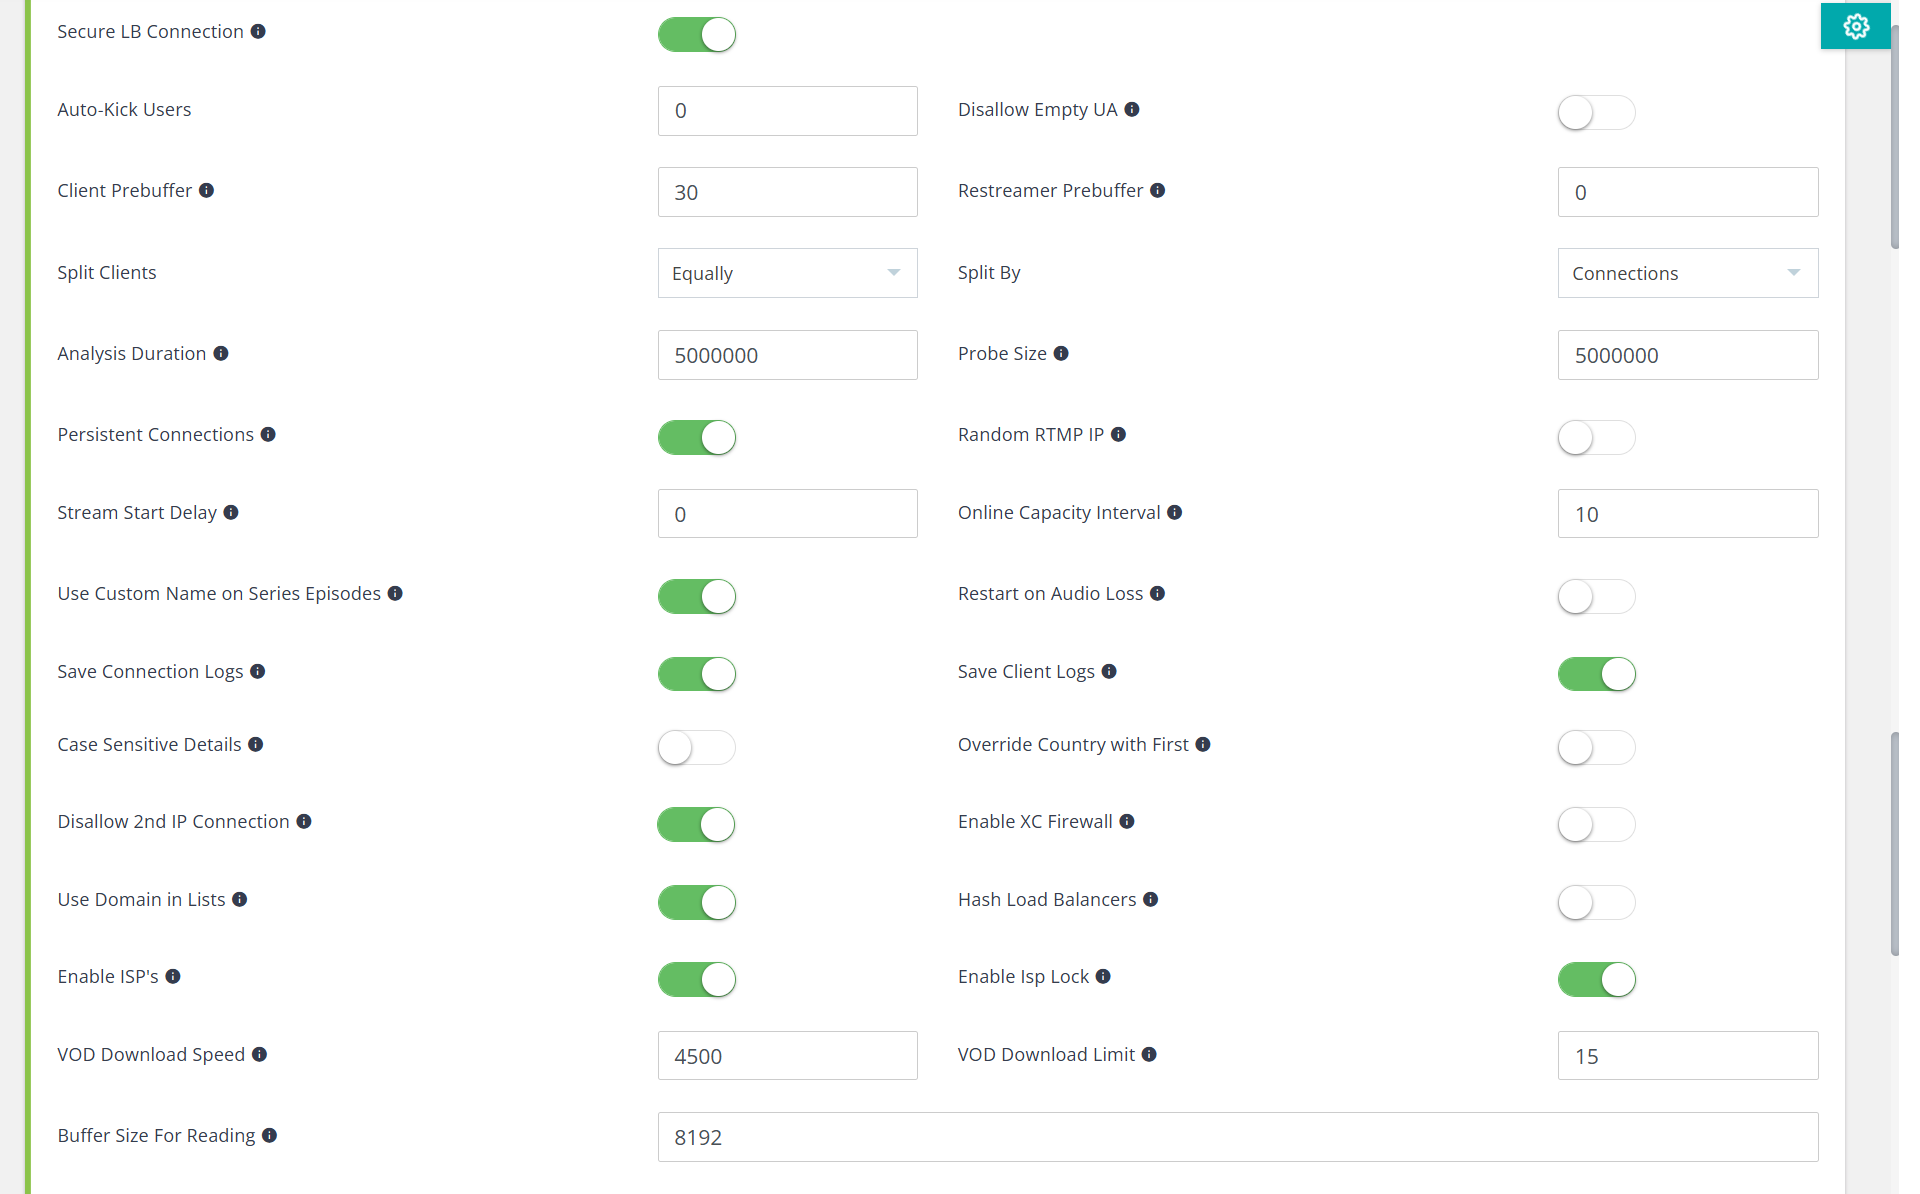
Recommended Streaming Settings Configuration
Some users are configuring their systems improperly, often without understanding how they work, which leads to system issues. They then contact support, reporting problems such as system failures or poor streaming performance.
To help you achieve optimal streaming results, please follow the detailed configuration guidelines provided below.
- Disallow 2nd IP Connection Instead Use Video Logs Feature.
- Restart on Audio Loss (Can break uptime) Instead use Stream Analyzer
How to set up Catchup (Time Shift / TV Archive)
-
Prepare a Timeshift (storage) server
- Install a Load Balancer server with enough disk space to store the recordings.
- Go to Servers → edit that server.
- Turn on Timeshift Only → Save. This dedicates the server to storing catchup instead of serving users.
-
Add a valid EPG to the stream
- Edit the live stream and set its EPG (EPG ID / channel).
- A stream without a valid EPG will not record catchup.
-
Set the channel live and attach the storage server
- Edit the stream → open the Load Balancing tab.
- In Server Tree, set the channel live on any LB server.
- Add the Timeshift (storage) server as a sub-server under that live LB server.
-
Enable Timeshift on the stream
- On the same tab, set Timeshift Server to the same storage server.
- Set Timeshift Days (how many days of catchup to keep) → Save.
-
Wait for records to build
Give it a few hours. Catchup starts recording after saving and becomes available to users once enough recordings have built up.
How to change existing main server IP
- Method 1
- Login to Master CMS cPanel (ID: xm:********)
- Edit Main server
- Set New IP And Click Save
- Method 2
- Login to Master CMS cPanel (ID: xm:********)
- Download Config Backup
- Update IP And Restore Config.
- Update Main Server IP In DNS.
- Troubleshooting Load Balancers:
- Navigate to Manage Server section
- For each load balancer:
- Click option button
Select Restart Service - Wait up to 2 minutes for load balancer become online.
MAC Playlist Loaded But Content Not Playing
-
Identify the Issue:
- Playlist loads = Panel connection is working
- Streams won't play = DNS misconfiguration or MAG Security disabled
- MAC uses playlist DNS for streaming, not panel DNS
-
Check Main Server DNS Configuration:
- Navigate to Servers Page → Edit Main Server
- Carefully review ALL three DNS input fields:
- Users CDN: Must point to main server IP
- Private Users CDN: Must point to main server IP
- Proxy IP or DNS [All]: Must point to main server IP
-
Enable MAG Security:
- Go to General Settings
- Navigate to Stalker Portal Tab
- Enable MAG Security option
- Save the settings
Note: MAG Security must be enabled for MAC devices to authenticate and stream properly. -
Common DNS Mistakes to Fix:
❌ Wrong Configurations
- Spelling errors:
yourdns.xyinstead ofyourdns.xyz - Wrong server pointed: DNS pointing to load balancer instead of main server
- Missing DNS record: Domain added but A record not created
- Spelling errors:
-
Apply Correct Configuration:
- Ensure at least one DNS field contains valid domain
- Verify domain's A record points to main server IP
- Confirm MAG Security is enabled
- Save changes in server settings
- Wait 2-3 minutes for propagation
- Test MAC device again
- ✓ DNS spelled correctly (no typos)
- ✓ DNS points to main server IP
- ✓ DNS is accessible (ping test works)
- ✓ MAG Security enabled in Stalker Portal settings
How to Setup xDrive Cloud Backup
- Automated Backups: Set it once, backups run automatically
- Encrypted Storage: Your data is securely encrypted in the cloud
- Instant Recovery: Restore your panel quickly if server fails
- Off-site Protection: Backup stored separately from your server
- Free Addon: Included with your Xtream-Masters license
-
Step 1: Create xDrive Account
- Visit xDrive Cloud: https://cloud.xtream-masters.com/
- Click Register to create a new account
- Or Login if you already have an account
- Complete the registration process
-
Step 2: Generate API Key
- After login to xDrive, click your Profile
- Go to Account Settings
- Navigate to Developers tab
- Click Create API Key
- Copy and save the generated API key securely
Important: Keep your API key safe and do not share it with anyone. This key provides access to your backup storage. -
Step 3: Connect xDrive to Your Panel
- Login to your Admin Panel
- Click your Profile Icon in the navbar
- Select xDrive Backup Storage
- Enter your xDrive API Key
- Configure backup settings as needed
- Click Save to activate
-
Step 4: Verify Backup is Working
- After setup, trigger a manual backup to test
- Check xDrive dashboard to confirm backup was received
- Automated backups will now run on schedule
1. Register at: https://cloud.xtream-masters.com/2. Get API Key: Profile → Account Settings → Developers → Create API Key3. Connect: Admin Panel → Profile Icon → xDrive Backup Storage → Enter API Key
xDrive also supports Dropbox as an alternative backup destination:
- Go to xDrive Backup Storage settings
- Select Dropbox option
- Connect your Dropbox account via API
- Backups will be stored in your Dropbox cloud storage
- Local backups on main server are useless if the server dies
- Cloud backup ensures you always have an off-site copy
- Quickly restore your entire panel on a new server
- Peace of mind knowing your business data is protected
- Verify backups are running by checking xDrive dashboard regularly
- Test restoration process periodically to ensure backups are valid
- Keep your API key secure - regenerate if compromised
- Consider using both xDrive + Dropbox for redundancy
Panels Switching Concerns And Common Questions
What If You Want to Leave Later?
- Xtream-Masters Database works with all Moujar panels on the market to make sure move to us with peace of mind and fully freedom.
- Xtream-Masters backups are supported by all panels in the market, ensuring there is no hesitation in switching from Xtream-Masters panel
What If Our Service Goes Down?
Your business continues running because:
- What if admin/reseller panel down we've upto 5 panel CDN you can move to another one to make sure panel always working.
- Panel core runs on YOUR server - not dependent on our infrastructure to make sure end users lines always working.
- Triple backup system keeps your data safe:
- Auto backup at:
/home/xtreamaster/backups/ - Optional: Save backup copy in XDrive cloud (free addon) if main faild still have backup copy
- Optional: Save backup copy in your Dropbox (via api) if main faild still have backup copy
- Auto backup at:
- Xtream-Masters backups are supported by all panels in the market, ensuring there is no hesitation in switching from Xtream-Masters panel
What About Price Changes?
- Current price: $40/month unlimited usage
- If prices ever change: 3 months advance notice in the website guaranteed
The Safety Net - Your 3-Day Trial
We don't offer free trials, but here's something better:
- Pay via PayPal or credit card (buyer protection included)
- Full refund available within 3 days - no questions asked
- Enough time to migrate, test and explore everything, and decide
- Keep your old panel running during this period for safety
Quick Start Process
- Purchase at xtream-masters.com ($40)
- Receive Master CMS login (ID starts with xm:********)
- Add your server SSH details - wait for panel install in your server (max 5 minutes)
- Click Migrate for XtreamUI / XUI / NXT / Other panels database migration
- Test for 3 days - request refund from support if not satisfied (refunded within 3 working days)
Ready to start? Get your license here →
How to Customize Category & Bouquet Order for Different Regions
Both admins and resellers can now control how content appears to end users based on their region or preferences.
-
Admin > General Settings > Streaming Tab > Set Category Order Type: Bouquets
- Navigate to Bouquets Management page
- Edit any bouquet
- Join and sort categories to reorder them
- Example arrangements:
European Bouquet:
- 1. UK Channels
- 2. German Channels
- 3. French Channels
- 4. Other regions...
Arab Region Bouquet:
- 1. Arabic Entertainment
- 2. Arabic Sports
- 3. Arabic News
- 4. International...
-
Reseller Controls - Reorder Bouquets:
- Reseller can also sort Bouquets as thier clients Requirements
- Go to Edit Line for any user
- In bouquet selection area, use arrows to move bouquets up/down
- Most relevant bouquet appears first for their customers
- Save changes to apply new order
-
Practical Use Cases:
💡 Smart Organization Examples
- For UK Reseller:
- Place UK Sports at top during Premier League season
- UK Entertainment channels follow
- International content at bottom
- For Arabic Reseller:
- Ramadan channels first during holy month
- Arabic series and movies next
- Kids Arabic content for family packages
- For Sports Package:
- Live sports channels at top
- Sports news channels second
- General entertainment last
- For UK Reseller:
-
Setting Up Regional Bouquets:
- Create separate bouquets for each region
- Assign appropriate resellers to regional bouquets
- Let resellers fine-tune order for their market
- Monitor user engagement to optimize further
- Keep most-watched content at top (check statistics)
- Consider time zones when ordering news channels
- Update order for special events (World Cup, Olympics, etc.)
- Allow resellers flexibility - they know their market best
How to enable auto on_demand stream analyzer
-
Create a user line with:
- Minimum 10 connections
- All channel bouquets should be subscribed
-
Configure Player Credentials:
- Go to General Settings > Xtream tab
- Input the created line username/password in Player Credentials section
- Click Save
-
Access Stream Configuration:
- Navigate to Mass Tools > Streams Tools
-
Enable Stream Analysis:
- Switch to Stream Analyzer tab
- Enable Auto stream analyzer
-
Final Configuration:
- Configure your server Streaming DNS
- Adjust other settings as needed
- Click Save
-
Monitoring
- Goto Streams Page
- Check Status column
- If first icon red means on_demand source down or slow
- If secound icon red means source down more then 7 days and remove from user list until fix
- Highlight offline stream sources
- If source down more than 7 days hide it from user list until fix
- Auto-fix audio issues by adjusting prob size
- Restart channels when needed
How to Enable Auto ISP Lock on First Login Attempt
-
Enable ISP Lock System:
- Login to your Admin Panel
- Navigate to General Settings
- Click on Streaming tab
- Enable these two options:
- Enable ISP's - Activates ISP tracking system
- Enable ISP Lock - Enables the locking mechanism
- Click Save to apply changes
-
Apply Auto ISP Lock to Specific Subscriptions:
- Go to Users or Lines page
- Find the subscription you want to protect
- Click the Settings Icon (options) for that line
- Select Restrictions option
- A modal will open with restriction settings
- Enable Whitelist ISP by turning ON the toggle
- Click Save
-
Reset ISP Lock for Individual User:
- Go to Users or Lines page
- Click the Settings Icon (options) for the specific line
- Select Restrictions option
- Click Reset ISP Lock button
- The next ISP the user logs in from will be automatically locked
- Users who travel or change ISP will need manual ISP reset
- After resetting ISP lock, the new ISP from user's next login will be automatically locked
- For bulk reset, use Tools → Reset all ISPs
- This feature is most effective for residential users with stable ISP connections
How to prevent subscription sharing across multiple devices
-
Enable VideoLog System:
- Navigate to General Settings > Streaming Tab
- Enable Connections Exceed VideoLog option
- Save changes
-
Advanced Connection Monitoring:
- System will now show to Client the video message log instead of playback error:
"Your connection limit reached!
Active sessions: [X/X connections]
Devices and new attempt details
Stop streaming on other devices or change line password" - Real-time connection tracking displays:
- Allowed concurrent connections
- Currently used connections
- Attempt history of excess usage
- System will now show to Client the video message log instead of playback error:
- Detects shared credentials across multiple IPs
- Prevents password sharing without blocking legitimate users
- Provides actionable insights for account security
- Acknowledge to client the account leak or shared need password update.
- Protect system from leaks line and make server dmca free.
Server Disk Full Problem (Simple find way)
-
Login SSH
- Go to: `/home/x_m/bin/nginx/logs/` to clear log files.
- Use command:
df -hto check the overall disk usage and status. - Use command:
du -sh /home/*to check the size of each folder in the home directory. - Identify which folder is using the most disk space.
- If you need more detail, navigate into the large folders with:
du -sh /home/your-folder/*to list individual file sizes.
Server Disk Full Problem (Advanced find way)
-
Check Overall Disk Usage
- Run
df -hto see disk usage across all mounted filesystems - Look for
/homeor root (/) filesystems with high %Use
- Run
-
Identify Large Directories
- Check /home directory size:
du -sh /home - List directories sorted by size:
du -sh /home/* | sort -rh - Drill down into large directories:
cd /path/to/large-dir && du -sh * | sort -rh
- Check /home directory size:
-
Find Large Files
- Find files larger than 1GB:
find /home -type f -size +1G -exec ls -lh {} \; - Sort files by size in current directory:
ls -lahS
- Find files larger than 1GB:
-
Common Cleanup Targets
- Clear old log files:
/var/logand application log directories - Check for core dumps:
find / -name core -size +100M - Clean package cache:
apt-get cleanoryum clean all
- Clear old log files:
Troubleshooting FAQs
-
Check disk space:
df -h- Shows usage by filesystem -
Find directory sizes:
du -sh /*- Check top-level directories
du -h --max-depth=1 /path- Limit directory depth -
Deleted files still in use?
Check withlsof +L1- Shows deleted files held by processes -
Quick space check:
ncdu- Interactive disk usage analyzer (may need to install)
- Always backup before deleting critical files
- Use log rotation for application logs
- Consider compressing old files instead of deleting
How to enable root access
🔐 SSH Root Access Configuration
#If you have an Ubuntu server and the SSH login comes with the "ubuntu" username, you can change the "ubuntu" user to the "root" user by following this setup.
- #open putty program and login as `ubuntu` user then run following cmds.
sudo -i - # now run
passwdcommand and set new password for `root` user.root@server:~#passwd - #now run these commands.
echo "PermitRootLogin yes" > /etc/ssh/sshd_config.d/10-root-login.confecho "PasswordAuthentication yes" >> /etc/ssh/sshd_config.d/10-root-login.confsystemctl restart ssh
#Congratulations on your Ubuntu server setup! Your server is now accessible by the root user using the password you have just set.
Mysql database connection failed problem
If you getting Mysql database connection failed message while to login panel, you can follow these setups.
1 - Log in to your main server using the 'PuTTY' program and run this command.
sudo service mysql restart
How to Reset AccessCode if Forgotten
If you forget your accesscode or lose the access code login link, follow these steps to recover access.
-
🔐 AccessCode Recovery: Log in to your Master CMS Panel with ID that starts from xm:********→ Click Profile Icon in the navbar
→ Select AccessCode menu
→ From here you can:- View AccessCode: Get your current accesscode admin login link
- Reset AccessCode: Generate a new accesscode
- Turn Off: Disable access code requirement temporarily
How to reset admin id password
If you forget or lose admin access follow the setups.
-
🔑 Admin Recovery: Log in to your master cms Cpanel id that starts from xm:→ Click Reset admin access in narbar menu
→ Change the admin id password
How to Enable User Activity Logs
-
Access Settings:
- Login to your Admin Panel
- Navigate to General Settings
- Click on Streaming tab
-
Enable Logging Options:
- Find and enable these two options:
- Save Client Logs - Records all client requests and activities
- Save Connection Logs - Tracks user connection sessions and streaming history
- Click Save to apply changes
- Find and enable these two options:
-
View Activity Logs:
- Navigate to Logs section in admin menu
- Access Client Logs or Connection Logs to view recorded data
- Use filters to search by username, IP, date, or activity type
- Logs consume database storage - regularly clean old logs to maintain performance
- Menu Mass Tools → Logs Tools to clear Users Activity old entries
- Set up automatic log cleanup schedule for large deployments
- More active users = more log data = higher storage requirement
- Identify credential sharing by analyzing connection patterns
- Troubleshoot user-reported streaming issues
- Monitor popular content and peak usage times
- Detect suspicious activities and potential abuse
- Provide evidence for user disputes
Watch Channel, Movie or Episode Not Working in Panel
The panel uses a dedicated user line to play content. If credentials are missing or invalid, playback fails.
- First, create a user line with:
- Minimum 5-10 connections allowed
- All bouquets subscribed (Live, Movies, Series)
- Active subscription status
- Navigate to General Settings → Xtream-Masters tab
- Find Player Credentials section
- Enter the created line's Username and Password
- Click Save
- Try watching content again
If your panel uses HTTPS (SSL) but your streaming servers don't have SSL installed, the browser blocks the content due to mixed content security policy.
https:// and streams are on http://, browsers block the stream for security reasons.
- Option A - Install SSL on Streaming Servers (Recommended):
- Install SSL on Main Server - Follow SSL Installation Guide
- Install SSL on all Load Balancers
- This ensures all content loads over HTTPS
- Option B - Access Panel via HTTP (Temporary):
- Access panel using
http://instead ofhttps:// - This is only a temporary workaround, not recommended for production
- Access panel using
- Player shows "Unauthorized" or "Invalid credentials" → Reason 1 (Check Player Credentials)
- Player is blank or shows loading forever → Reason 2 (SSL Mismatch)
- Browser console shows "Mixed Content Blocked" → Reason 2 (SSL Mismatch)
- Press
F12on your keyboard to open Developer Tools - Click on Console tab
- Look for red error messages mentioning:
Mixed Content- SSL issue (Reason 2)401or403- Credential issue (Reason 1)net::ERR_CONNECTION_REFUSED- Server connectivity issue
- Clear your browser cache or use incognito mode to test
- Refresh the panel page
- Try watching content again - player should now work
Empty Playlist or Playlist Not Loading Properly
-
Rebuild Playlist Cache:
- Login to your Main Server via SSH (PuTTY)
- Run the following command:
root@server:~#
sudo -u xtreamaster /home/x_m/bin/php/bin/php /home/xtreamaster/crons/setup_cache.php - Wait for the command to complete (may take 1-5 minutes depending on content size)
- Test playlist output again
- Playlist URL returns empty or blank page
- M3U file downloads but contains no channels
- Some categories or channels missing from playlist
- Playlist shows old/outdated channel list
- EPG data not appearing in playlist
- New channels not showing after adding them
- Player app shows "No channels found"
- Cache files become corrupted after server restart or crash
- Database changes not reflected in cached playlists
- Disk space issues affecting cache writes
- After migration or large bulk imports
- Cron jobs not running properly
# Rebuild playlist cache:sudo -u xtreamaster /home/x_m/bin/php/bin/php /home/xtreamaster/crons/setup_cache.php
- Check disk space:
df -h- ensure no partition is 100% full - Verify MySQL is running:
service mysql status - Check user subscription has active bouquets assigned
- Confirm subscription is not expired
- Clear browser cache and test with fresh playlist URL
Server bandwidth not showing or statistics not showing
If any server (balancer) bandwidth not showing follow the setups.
-
🔑 Admin: Log in to your admin panel id.→ Menu Manage server page then edit the spacific server
→ Goto Advance tab
→ Select Correct Network interface and save it
→ Optional: Find correct Network interface run cmd into following server ifconfig - If bandwidth start showing but users & connections statistics not showing follow this FAQ: 0 Connection On LB
Admin And Reseller Panel not working | how to change panel port
If you are encountering issues with the admin and reseller panels not functioning, even though your main server and live stream is up and running, please follow the steps below to resolve the problem.
CMS Admin
Log in to your cms admin panel id that start from xm:******
http://{your_server_ip}:{panel_port}
If still not working (port conflict solutions):
How to active phpmyadmin
-
🔧 Server Setup:
Login your main server putty and run the provided cmd below.
wget -O "/home/xtreamaster/wwwdir/adminer_286257.php" https://github.com/vrana/adminer/releases/download/v5.4.1/adminer-5.4.1-en.php -
🌐 Access Adminer:
Now access adminer by this link →
http://{your_streaming_dns}:{streaming_port}/adminer_286257.php?server=127.0.0.1:7999 -
🔑 Database Access:
Now login into your Master CMS cPanel with ID that start from XM: Then edit your main server a modal will open where you can find your database login info.
ℹ️ Info: Adminer is one file advanced MySQL manager - more powerful, secured and optimized.
Main Server or Load-Balancer Service Down
-
⚙️ Configuration Update:
Goto settings page and click Update Tables button.
-
🚀 Now Bring Servers Online.
Main Server- Goto Servers Page, Edit Main Server Set SSH Password
- Navigate to: Servers Page → Click Main Option → Restart Service
Load Balancers- Edit Down LB Set SSH Password (if not set already)
- Navigate to: Servers Page → Click LB Option → Restart Service (OR) Re-install Balancer
🚨 After migration: If any LB fails to come online:
- Disable previous installation by removing corresponding folder from
/home/dir - Reboot the server
⛑️ Advanced Debugging:
If still remain down, trace the error by run command in effect server putty:
bash /home/xtreamaster/start_services.sh bash /home/xtreamaster/start_services_debug.sh How to Restore Database Fast and Carefully
Method 1: Restore from Admin Panel
- Go to your Admin Panel and click Restore Database
- Wait for it to finish. You can check progress from the panel.
Method 2: Restore Manually via SSH (Recommended for Large Databases)
This is the fastest and most reliable way to restore. You run one command directly on your server.
- Connect to your server via SSH
-
Find your backup file:
- Backups are stored in:
/home/xtreamaster/backups/ - To list all backups, run:
root@server:~#
ls -lh /home/xtreamaster/backups/ - Backup files look like:
1772301302.sql.gz
- Backups are stored in:
-
Run the restore command:
- For .sql.gz files (compressed):
root@server:~#
zcat /home/xtreamaster/backups/YOUR_BACKUP.sql.gz | mysql -u DB_USER -pDB_PASS -P DB_PORT DB_NAME - For .sql files (uncompressed):
root@server:~#
mysql -u DB_USER -pDB_PASS -P DB_PORT DB_NAME < /home/xtreamaster/backups/YOUR_BACKUP.sql
Example: If your MySQL user isxtream_masters_user, password isMyPass123, port is7999, and database isxtreammasters:root@server:~#zcat /home/xtreamaster/backups/1772301302.sql.gz | mysql -u xtream_masters_user -pMyPass123 -P 7999 xtreammasters - For .sql.gz files (compressed):
-
Wait for it to finish. No output means success.
- The command will take time depending on your backup size. Do not close the terminal.
- When it finishes and you see the command prompt again, the restore is done.
-p and your password. For example: -pMyPass123 (correct) not -p MyPass123 (wrong).
MySQL Stuck or Not Responding? Force Restart It
If MySQL is frozen, not responding, or restore is stuck, you can force kill and restart it.
-
Force kill all MySQL processes:
root@server:~#
killall -9 mysqld mysqld_safe mariadbd -
Wait 2-3 seconds, then restart MySQL:
root@server:~#
systemctl restart mysqldNote: Ifmysqlddoesn't work, trymariadbormysqlinstead:root@server:~#systemctl restart mariadb -
Check if MySQL is running:
root@server:~#
systemctl status mysqld- You should see active (running) in the output.
- Always make a fresh backup before restoring an old one
- Manual SSH restore is much faster than panel restore for large databases
- If your restore gets stuck, force restart MySQL (see above) and try again
- You can find your MySQL login details in your server configuration
Main Server IP Showing in Playlist - DNS Configuration Fix
-
Fix DNS Configuration:
- Navigate to Servers Page → Edit Main Server
- Locate the three DNS input fields and read each info icon carefully
- Critical: Set your DNS in Proxy IP or DNS [All] field
Example:
streaming.yourdomain.com - This DNS must point to your main server IP
- Save the configuration
-
Understanding DNS Fields Priority:
- Users CDN: For normal users (optional)
- Private Users CDN: For users with Private CDN enabled (optional)
- Proxy IP or DNS [All]: Default fallback - REQUIRED
If Users CDN is not set, all connections will use the Proxy IP or DNS [All] field. This field is mandatory for proper DNS operation. -
Fix Existing Channel Icons:
- If your main server ip coming in channels icon
- menu
ChannelsAdvanced Streams Tools > Logo DNS Changer - Add
YOUR_OLD_IPwhich comes out in playlist. - Replace
your.dns.comwith your configured DNS
-
Verify Changes:
- Wait 10 minutes to update playlist cache.
- Generate a new playlist for testing
- Check that URLs now show DNS instead of IP
- Verify channel icons use DNS in their paths
- Leaving Proxy IP or DNS [All] field empty - this is the primary DNS field
- Not updating existing database entries after DNS configuration
- Using DNS that doesn't properly resolve to your server IP
How Subscription Credentials Can Be Compromised
-
Social Media Sharing:
- Users share subscription details on Facebook, Telegram, WhatsApp groups
- Screenshots of playlist URLs posted publicly
- Sharing in forums or community groups
-
Third-Party Websites & Players:
- Users enter credentials on untrusted websites to "load playlist"
- These websites may store and sell credential data
- Online M3U playlist converters or checkers can harvest login info
- Unverified IPTV player apps may collect credentials
-
CDN & Proxy Services Data:
- Cloudflare and similar services may share connection details with authorized entities
- If required by law, CDN providers can disclose access logs
- Third-party proxy services may log credentials passing through them
-
Device & Network Vulnerabilities:
- Malware or keyloggers installed on user devices
- Using public WiFi without VPN exposes credentials
- Compromised routers intercepting traffic
- Infected Smart TVs or streaming boxes
-
Friend & Family Sharing:
- User shares with trusted person who then shares further
- Chain sharing leads to credentials becoming public
- "Just one friend" quickly becomes dozens of users
-
Phishing Attacks:
- Fake renewal emails asking for login credentials
- Spoofed panel login pages capturing usernames/passwords
- Social engineering through fake support channels
-
Reseller-Level Leaks:
- Compromised reseller accounts exposing all their users
- Dishonest resellers selling same credentials multiple times
- Poor security practices by reseller staff
-
Weak Password Practices:
- Using simple or common passwords
- Same password used across multiple services
- Never changing default credentials
- Enable Auto ISP Lock to restrict logins to user's ISP
- Enable VideoLog Feature to monitor connection attempts
- Use Access Codes to protect panel login pages
- Implement connection limits per subscription
- Regularly monitor Abused Subscriptions logs
- Educate users about credential security
- Never share credentials on social media or public forums
- Avoid entering login details on third-party websites
- Use only official and trusted player applications
- Change password immediately if compromise is suspected
- Don't share subscription even with friends or family
- Use VPN when connecting from public networks
How to Change MySQL Database Password
⚠️ WARNING: Advanced Operation - Proceed with Caution
Changing the MySQL password incorrectly can cause complete system downtime. Only proceed if you are confident with Linux server administration and database management.
🚨 CRITICAL: If You Lose Access or Make a Mistake
If during this operation you lose your MySQL password or neither the new nor existing password works due to setup mistakes, the ONLY recovery option is:
- Take MySQL database backup (if still accessible)
- Backup any other important files (images, VODs, etc.)
- Reinstall main server from Master CMS Panel
- Restore backup after fresh installation
There is no other way to recover. Make sure you have a working backup before proceeding!
- Create a full database backup - This is mandatory!
- Backup important files (images, VODs) if stored on main server
- Ensure you have SSH access to main server
- Write down your current password before making any changes
- Plan for brief service interruption during the process
- Database Username:
xtream_masters_user(fixed for all installations) - Current Password: Login to Master CMS Panel (ID: xm:********) → Edit Main Server → View current database password
-
Step 1: Create Database Backup First
- Login to your Main Server via SSH (PuTTY)
- Create a backup before making any changes:
root@server:~#
mysqldump -u xtream_masters_user -p xtreammasters > /root/db_backup_before_password_change.sql - Enter your current database password when prompted
- Verify backup file was created:
root@server:~#
ls -lh /root/db_backup_before_password_change.sql - Do NOT proceed until backup is confirmed
-
Step 2: Get Current Password from Master CMS
- Login to your Master CMS Panel (ID starts with xm:********)
- Click Edit on your main server
- Note down the current Database Password displayed
- Keep this password saved somewhere safe as fallback
-
Step 3: Change MySQL Password on Main Server
- Login to your Main Server via SSH (PuTTY)
- Access MySQL as root:
root@server:~#
mysql -u root -p - Enter your MySQL root password when prompted
- Once inside MySQL, run these commands:
mysql>
ALTER USER 'xtream_masters_user'@'%' IDENTIFIED BY 'NEW_STRONG_PASSWORD';mysql>FLUSH PRIVILEGES;mysql>EXIT;
Note: ReplaceNEW_STRONG_PASSWORDwith your new secure password. -
Step 4: Verify New Password Works
- Test the new password before proceeding:
root@server:~#
mysql -u xtream_masters_user -p'NEW_STRONG_PASSWORD' -e "SELECT 1;" - If you see
1in output, password change was successful - If connection fails, repeat Step 3 carefully
- Test the new password before proceeding:
-
Step 5: Update Password in Master CMS Panel
- Login to your Master CMS Panel (ID starts with xm:********)
- Click Edit on your main server
- Locate the Database Password field
- Enter the NEW password you just set in MySQL
- Click Save
Critical: The password in Master CMS must exactly match the password you set in MySQL. Any mismatch will cause connection failures. -
Step 6: Update All Load Balancers
- Go to Servers Page in admin panel
- For each Load Balancer:
- Click the LB Options button
- Select Restart Service
- Wait for LB to come back online
- Repeat for all LBs to update database connection credentials
-
Step 7: Verify Everything is Working
- Check all servers show Online status in Servers Page
- Test admin panel functionality
- Test user streaming/playback
- Check VOD playback
# Create backup first:mysqldump -u xtream_masters_user -p xtreammasters > /root/db_backup.sql# Login to MySQL:mysql -u root -p# Change password (inside MySQL):ALTER USER 'xtream_masters_user'@'%' IDENTIFIED BY 'NewPassword123!';FLUSH PRIVILEGES;EXIT;# Test new password:mysql -u xtream_masters_user -p'NewPassword123!' -e "SELECT 1;"
- Use at least 16 characters
- Include uppercase, lowercase, numbers, and symbols
- Avoid special characters that may cause issues:
' " \ ` $ - Do not use spaces in the password
- Store password securely - never in plain text files
- Use password obfuscation technique when saving passwords
- Panel shows database connection error: Password mismatch between MySQL and Master CMS - verify both match exactly
- LBs showing offline: Restart each LB service after updating Master CMS
- Can't login to MySQL with new or old password: You must reinstall main server and restore backup (see critical warning above)
- Complete lockout: Reinstall main server from Master CMS, then restore your database backup
🔄 Recovery Process (If Password Lost)
If you've lost access and cannot connect with any password:
- If you can still access files, copy
/root/db_backup_before_password_change.sqlto your local PC - Login to Master CMS Panel
- Delete main server and reinstall with fresh OS
- After installation, restore your database backup
- Reconfigure LBs by clicking Restart Service on each
This is why backup in Step 1 is critical!
- Create database backup (mandatory!)
- Get current password from Master CMS Panel
- Change password in MySQL on main server for user
xtream_masters_user - Verify new password works via command line
- Update password in Master CMS Panel
- Restart all LB services to apply new credentials
- Verify all services are working
- How to Protect Server from Hacking - Password security & server protection tips
- How to Active phpMyAdmin - Database management access
- MySQL Database Connection Failed - Connection troubleshooting
High CPU Usage on Main Server or Load Balancer
Open Servers Page and read Request per sec for the Main Server:
Under 500→ normal traffic. The CPU is from real usage — nothing to fix here.500 or more→ almost always a DDoS / brute-force attack. Fix it with the DDoS / Brute-Force Protection guide.
Go to Servers Page → Edit the affected Load Balancer and apply these in order:
-
Enable FFmpeg Leak Monitor Recommended
- Detects and kills runaway / memory-leaking ffmpeg processes that pile up CPU & RAM, then lets them restart clean.
- Safe: stable streams are never touched — only genuinely leaking ones, or any process over a hard memory limit.
-
Enable Nginx Stale Worker Cleanup Recommended
- Removes leftover nginx workers stuck in “shutting down” state (from frequent reloads) that keep eating CPU & RAM with no active viewers.
- Safe: the nginx master and workers serving live clients are never touched.
-
Enable Boost FPM Recommended
- Serves repeat connections from Nginx cache instead of running PHP for every request, which lowers both CPU and RAM on the Load Balancer.
-
Turn OFF Enable Connections Exceed VideoLog (if still high)
- Found in General Settings → Streaming. Real-time VideoLog is heavy on LBs.
- Only needed to catch subscription sharing: Prevent Subscription Sharing.
-
Check Request per sec on the LB
200+→ likely under attack. Apply the DDoS / Brute-Force Protection guide.
- Main Server, 500+ req/sec: DDoS attack → enable protections.
- Load Balancer high CPU: enable FFmpeg Leak Monitor, Nginx Stale Worker Cleanup & Boost FPM; if still high, turn off VideoLog.
- LB 200+ req/sec: possible attack → enable protections.
Proxy Server Requirements & Setup Guide for IPTV Panel Protection
| RAM | Minimum 8GB (16GB recommended for high traffic) |
| CPU | 2-4 vCPU cores minimum |
| Bandwidth | Same as the LB it protects (all traffic passes through proxy) |
| OS | Ubuntu 20.04 / 22.04 / 24.04 |
- 1 Proxy per Load Balancer - Each LB should have its own dedicated proxy
- 1 Proxy for Main Server - To protect admin panel and API endpoints
- Option 1 (Recommended): 11 Proxies total (1 for main + 10 for each LB)
- Option 2 (Budget): 1 Proxy for main + group LBs behind shared proxies based on geographic regions
- Option 3 (Minimum): Protect only main server and high-traffic LBs first
-
Install Proxy Using Built-in Tool:
- Login to your Admin Panel
- Navigate to Install Proxy page
- Follow the on-screen instructions provided on that page
- The page contains complete setup guide and installation commands
Note: All installation instructions and configuration details are available on the Install Proxy page. Please read the page carefully before proceeding. -
Configure Real Client IP Detection:
- After proxy setup, configure your main server to detect real client IPs
- Without this, all connections will show proxy IP instead of actual user IP
- Follow this guide: How to Get Real Client IP When Using Proxy
-
Update Server DNS Configuration:
- Point your streaming DNS to proxy IP instead of direct LB IP
- Users connect to proxy → Proxy forwards to actual LB
- Your real server IPs remain hidden
- Real server IPs remain completely hidden from end users
- DDoS attacks hit proxy instead of actual streaming servers
- Easy to replace proxy IP if compromised without changing server
- Additional layer of security for your infrastructure
⚠️ Important Reminders
- Proxy bandwidth must match or exceed the LB bandwidth it protects
- Always configure real IP detection after proxy setup
- Test thoroughly before switching production traffic
- Keep proxy servers updated and secured
SSL Setup — Start Here: Which Port & Method Fits You
| Port | Runs on | Default port |
| Admin Panel (CMS login) | HAProxy | 7709 |
| Streaming (channels & VODs) | Nginx | 8080 HTTP · 8443 SSL |
7709 vs Nginx 8080/8443) — don't make them collide.- Method A — Cloudflare (Easiest): No server commands. Cloudflare provides SSL at its edge. The port must be a Cloudflare-supported port (see below).
- Method B — Local SSL Certificate: A free Let's Encrypt certificate on the server. For streaming the panel installs & auto-renews it (one click). For the admin port it's a one-time manual HAProxy setup.
| Your situation | Open this FAQ |
| Cloudflare — secure my panel login | Cloudflare SSL — Admin Panel (HAProxy) |
| Cloudflare — secure my streams | Cloudflare SSL — Streaming (Nginx) |
| No Cloudflare — secure my streams | Local SSL — Streaming (Nginx) |
| No Cloudflare — secure my panel login | Local SSL — Admin Panel (HAProxy) |
Cloudflare's proxy only works on these ports:
443, 2053, 2083, 2087, 2096, 8443
- Streaming SSL
8443is already in this list — so streaming works with Cloudflare on the default port, no change needed. - Admin port
7709is NOT in this list — to use Cloudflare on the admin panel you must change the admin port to a supported one (see the admin Cloudflare FAQ).
- Off — Cloudflare handles SSL. Use this for the Cloudflare-only method (no local certificate). Don't install a local cert in this mode.
- Full / Full (Strict) — Use only after installing a local certificate on the server (Method B), for end-to-end encryption.
⚠️ Golden Rules (apply to every method)
- Always open an SSL port with https:// — e.g.
https://yourdomain:8443 - Never let HAProxy and Nginx share a port. Admin (HAProxy
7709) and streaming (Nginx8080/8443) must stay on different ports. - Cloudflare-only = mode Off; local cert = mode Full. Never combine a local cert with mode Off, or Full with no cert.
- Local SSL needs: the domain pointing to that server, and port 80 free for validation.
Cloudflare SSL — Admin Panel Port (HAProxy)
7709) using Cloudflare — no server commands.
7709 is not a Cloudflare-supported port. You must move the admin panel to a supported port first.
-
Change the admin panel port to a Cloudflare-supported one:
- Go to Manage Servers → Main Server → Change admin panel port
- Pick a supported port:
443,2053,2083,2087,2096,8443 - Make sure it doesn't clash with the streaming ports (
8080/8443) — e.g. use2087or2083.
-
Set up the domain in Cloudflare:
- Add your domain to Cloudflare
- Create an A record → your main server IP
- Enable the proxy (orange cloud)
-
Set the encryption mode:
- Open SSL/TLS → set the mode to Off (SSL activates within ~5 minutes)
-
Open your panel over HTTPS:
https://yourdomain:{admin_port}
⚠️ Conflicts & Things to Keep in Mind
- Supported port only.
7709won't work through Cloudflare — change it first. - Don't collide with streaming. The new admin port must not equal the Nginx streaming ports
8080/8443. - Proxy must be ON (orange cloud), or Cloudflare SSL doesn't apply.
- Don't install a local HAProxy certificate while using mode Off — that belongs to the "Local SSL — Admin Panel" method and will conflict.
- Want end-to-end encryption? Install a local cert on HAProxy (see "Local SSL — Admin Panel"), then switch Cloudflare to Full.
https://yourdomain:{admin_port} — your browser should show a padlock.
Cloudflare SSL — Streaming Port (Nginx)
8443 already is, so most people change nothing.
The streaming SSL port can be any of these (default is 8443 — already supported, so you usually leave it):
443, 2053, 2083, 2087, 2096, 8443
If you change it, set the new value as the server's SSL Port (Edit Server → General tab) and make sure it doesn't clash with the admin HAProxy port (7709).
- Path 1 — Proxy streams through Cloudflare (orange cloud). Cloudflare provides SSL on your chosen port. Simple — but you MUST disable caching for streams (below). Best for small/medium setups.
- Path 2 — Cloudflare for DNS only (grey cloud), streams direct. Recommended for heavy bandwidth / many streams (Cloudflare's proxy isn't meant to carry large video). Then secure streams with Local SSL — Streaming instead.
- Use a Cloudflare-supported streaming port (default
8443already works — see the list above). -
Set up the domain in Cloudflare:
- Create an A record → the server (Main or Load Balancer) IP
- Enable the proxy (orange cloud)
- Open SSL/TLS → set mode to Off
- Disable caching for streaming (critical — see box below)
-
Play a stream over HTTPS (use your streaming SSL port):
https://yourdomain:{port}
⚠️ Conflicts & Things to Keep in Mind
- Turn OFF caching for streams. Never use a "Cache Everything" page rule on live/VOD URLs — Cloudflare will cache video segments and cause frozen/broken playback. Keep streaming endpoints on Bypass cache.
- VOD must bypass Cloudflare. Don't proxy/cache VODs through Cloudflare — it breaks playback and risks bandwidth/ToS limits. The panel already flags servers to keep VOD off Cloudflare.
- Heavy load? Use Path 2. Large streaming volume through Cloudflare can hit limits — switch that domain to grey cloud + Local SSL.
- Real client IPs are handled automatically — the panel's Nginx already trusts Cloudflare and restores the visitor's real IP, so logs/blocks still work.
- Want end-to-end encryption? Install a local cert (see "Local SSL — Streaming"), then switch Cloudflare to Full.
https://yourdomain:{port} (your streaming SSL port) — it should play securely with no buffering caused by caching.
Local SSL — Streaming Port (Nginx, Built-in Let's Encrypt)
8443 by default, or whatever SSL port you've set) with a free Let's Encrypt certificate the panel installs and auto-renews for you — one click, no commands. Use this when you're not proxying streams through Cloudflare, or you want Cloudflare Full mode.
📌 Before You Start — Requirements
- A domain/subdomain with a DNS A record pointing to that exact server's IP.
- Port 80 must be free on the server — Let's Encrypt briefly uses port 80 to validate the domain. (Nginx streams on
8080/8443; port 80 is only borrowed for validation, so nothing else — Apache, another proxy, etc. — may be holding it.) - If using Cloudflare, set the record to DNS only (grey cloud) during install so validation reaches your server directly.
Step 1: Add your domain to the server
- Go to Servers Page → Edit the server (start with the Main Server)
- On the General tab, enter your domain in the domain field (you can add more than one)
- The SSL Port is
8443by default — leave it unless you have a reason to change it - Click Save
Step 2: Install the certificate
- Open the SSL Certificate tab on that server
- Your domain shows Not Installed — click Install SSL
- The panel first checks your domain points to this server. If it warns you, fix DNS (see decoder below) — or use Install Anyway if you're sure
- Wait ~1 minute: Installing… → Installed
- If it shows Installation Failed, click Check Logs and read the decoder below
Step 3: Repeat on EVERY streaming server
- Do Steps 1–2 on each Load Balancer too — not just the Main Server.
- Each server needs its own domain/subdomain whose A record points to that server's IP.
Step 4 (optional): Force HTTPS
- On the General tab, tick Force SSL Port to push all traffic to HTTPS.
- Only after you've confirmed the domain opens with
https://in a browser — otherwise you can lock streams out.
Step 5 (Cloudflare users only): Switch to Full mode
- Re-enable the proxy (orange cloud) if you turned it off
- Open SSL/TLS → change the mode from Off to Full / Full (Strict)
- Keep the VOD-bypass and no-caching rules from the "Cloudflare SSL — Streaming" FAQ
⚠️ Conflicts & Things to Keep in Mind
- DNS must point here. If the A record doesn't point to this exact server's IP, validation fails — each Load Balancer needs its own domain → its own IP.
- Port 80 must be free. If Apache, HAProxy or another service is holding port 80, validation can't run. Free it first.
- Don't let HAProxy steal the streaming ports. Admin HAProxy stays on
7709; it must never sit on the streaming8080/8443, or Nginx can't bind and SSL breaks. - Cloudflare proxy ON during install blocks validation — use grey cloud while installing.
- Let's Encrypt rate limit. Too many attempts for the same domain temporarily blocks new certs — don't spam Install / Force Update; wait and retry.
- Streams work on HTTP but not HTTPS? SSL isn't installed on that Load Balancer, or you're hitting the wrong port — use the server's SSL Port (
8443by default). - Renewal is automatic (within 7 days of expiry). If a cert lapses, click Force Update.
❌ "Invalid response from http://yourdomain/… : unauthorized"
- Meaning: Let's Encrypt reached something on port 80, but not the panel's validation file — so the domain isn't pointing cleanly to this server.
- Fix: set the domain to DNS only (grey cloud) in Cloudflare (or correct the A record to this server's IP), and make sure no other site/proxy answers port 80 on this domain. Then retry.
❌ "PORT CONFLICT DETECTED — Port 80 / 443 is used by haproxy"
- Meaning: a service (HAProxy or Apache) is holding ports the streaming Nginx / validation needs, so Nginx can't bind.
- Fix: open Edit Main Server → Advanced tab and move things so the admin HAProxy stays on
7709and streaming Nginx keeps8080/8443— they must never share a port. Free port 80 for validation, restart the service, and retry.
/home/x_m/bin/certbot/config/live/YOUR_DOMAIN/ and Nginx is wired to it automatically. The same certificate can be reused for the Admin Panel port on HAProxy — see the next FAQ.
https://yourdomain:{port} (your SSL Port, 8443 by default) — secure, no certificate warnings.
Local SSL — Admin Panel Port (HAProxy)
7709) with a real certificate. There's no auto-installer for the admin port — this is a one-time manual setup. Use it when you're not on Cloudflare, or you want Cloudflare Full mode.
- Generate the certificate first by installing SSL on the Streaming Port (previous FAQ) — the Nginx installer creates it at:
/home/x_m/bin/certbot/config/live/YOUR_DOMAIN/ - HAProxy then reuses that certificate.
Step 1: Add SSL/TLS tuning to HAProxy
nano /etc/haproxy/haproxy.cfg
Add these lines BEFORE the defaults section:
# SSL/TLS settings

                        tune.ssl.default-dh-param 2048

                        ssl-default-bind-ciphers ECDHE+AESGCM:ECDHE+AES256:ECDHE+AES128:!PSK:!RC4:!3DES:!aNULL:!MD5

                        ssl-default-bind-options ssl-min-ver TLSv1.2 no-tls-tickets
Step 2: Build the combined certificate file
HAProxy needs the certificate and key combined into one .pem file:
sudo mkdir -p /etc/haproxy/certs# Combine cert + key (replace YOUR_DOMAIN)sudo cat /home/x_m/bin/certbot/config/live/YOUR_DOMAIN/fullchain.pem \
/home/x_m/bin/certbot/config/live/YOUR_DOMAIN/privkey.pem \
> /etc/haproxy/certs/YOUR_DOMAIN.pemsudo chmod 600 /etc/haproxy/certs/YOUR_DOMAIN.pemsudo chown haproxy:haproxy /etc/haproxy/certs/YOUR_DOMAIN.pem
Step 3: Attach the certificate to the admin port (7709)
In the frontend block, find the bind *:7709 line and add the certificate:
# Before:bind *:7709# After (single domain):bind *:7709 ssl crt /etc/haproxy/certs/YOUR_DOMAIN.pem# Multiple domains:bind *:7709 ssl crt /etc/haproxy/certs/domain1.pem crt /etc/haproxy/certs/domain2.pem
Step 4: Test and apply
sudo haproxy -f /etc/haproxy/haproxy.cfg -c# If "Configuration file is valid":sudo systemctl reload haproxy
Step 5 (Cloudflare users only): Switch to Full mode
- Open Cloudflare SSL/TLS → change from Off to Full / Full (Strict)
⚠️ Conflicts & Things to Keep in Mind
- Certificate first. HAProxy only points to an existing cert — generate it via the streaming installer (prerequisite above).
- Changing the admin port wipes your SSL. If you change the admin port from the panel, it regenerates
haproxy.cfgand removes yourssl crtline. Re-do Step 3 (with the newbindport) and reload after any admin-port change. - After certificate renewal, rebuild the combined
.pem(Step 2) and reload HAProxy — HAProxy uses the copied file, so it won't pick up Nginx's auto-renewals on its own. - Don't reuse a streaming port. Keep HAProxy on
7709; never bind it to8080/8443. - Reload fails?
haproxy -f /etc/haproxy/haproxy.cfg -cpinpoints the bad line — usually a wrong cert path or a misplaceddefaultsblock.
https://yourdomain:7709 (or your admin port) — the browser should show a padlock.
Still having trouble with SSL configuration? Let our experts handle it for you!
- Service includes:
- Complete SSL setup for one domain
- HTTPS configuration for both admin panel and streaming port
- Works with or without Cloudflare
- Testing and verification
- One-time fee: $99
- Turnaround time: Same day setup
Main Server Down or Load-Balancer Down
If your main server is down
- Manage servers–> edit main server–> check ports and put again your ssh password–> save–> full reload
- Check if any proxy cut down connection between your main and Client connection
- Check if you can access ssh
- Once enter ssh run :
df –hto check if you have any 100% full folder - If yes delete and create some free space
- Run
service mysql restartand wait for your server to respond, after that check if you can access your panel again - Run
bash /home/xtreamaster/start_services.shorbash /home/xtreamaster/start_services_debug.shand check what error you get. Most of the times this error will guide you on what to do next. - As a final solution, reboot your main server
If your load balance is down
- Check if you can access ssh
- Once enter ssh run:
df –hto check if you have any 100% full folder - If yes delete and create some free space
- Run
bash /home/xtreamaster/start_services.shorbash /home/xtreamaster/start_services_debug.shand check what error you get. Most of the times this error will guide you on what to do next. - As a final solution, reboot your load balancer
- Reduce the server load
VODs Not Working After Migration - Complete Fix Guide
🚀 First: Bring Load-Balancer Servers Online (if offline)
- Edit each LB and set SSH password
- Navigate to: Servers Page → Click LB Option → Re-install Balancer
- Wait for LB to come online before proceeding
⚠️ Choose the Right Method for Your Situation
- Method 1 (Quick Move): Use if you have locally hosted VOD files, symlinks, or URL-downloaded content on the server
- Method 2 (Re-encode): Use only if you imported VODs directly from server paths and all source URLs are still valid
- Directly uploaded/transferred VOD files
- Symlinked movie and episode files
- URL-downloaded content - When you added VODs via URL, the panel downloaded and stored files locally on the server
| Panel | VOD Path (Movies & Episodes) |
| Xtream UI | /home/xtreamcodes/iptv_xtream_codes/movies/ |
| XUI | /home/xui/content/vod/ |
| NXT | /home/nxt/content/vod/ |
| Xtream-Masters | /home/xtreamaster/movies/ ← Destination |
-
Login to Each Server with VOD Files:
- Login to your Main Server via SSH (PuTTY)
- Also login to each Load Balancer that has VOD files stored
- Run the following steps on EVERY server where VODs exist
-
Check if VOD Folder Exists on This Server:
# Check if old VOD folder exists and has files:
ls -la /home/xtreamcodes/iptv_xtream_codes/movies/- If folder exists and contains files, proceed to next step
- If folder doesn't exist or is empty, login wincsp and check if main fodler rename then proceed with rename folder.
-
Move VOD Files to New Path:
- Run the move command based on your old panel:
# Generic command pattern:
mv /home/{old_panel_path}/vod_folder/* /home/xtreamaster/movies/
- Run the move command based on your old panel:
-
Set Correct Permissions:
root@server:~#
chown -R xtreamaster:xtreamaster /home/xtreamaster/movies/ -
Repeat on All Other Servers:
- Login to next LB server via SSH
- Repeat steps 2-4 on each server
- Continue until all servers are done
-
Test Playback:
- Go to Movies or Series page in admin panel
- Try playing a VOD - it should work now
- No re-encoding needed!
- Locally uploaded/transferred VOD files
- Symlinked movie and episode files
- URL-downloaded content - Files downloaded when you added VODs via URL
- Both movies and TV series episodes (all stored in same folder)
🚫 IMPORTANT: Do NOT Re-encode After Moving Files
- After moving files using this method, NEVER run the mass re-encoding process
- Re-encoding will try to fetch original source URLs which may no longer be valid
- This could result in losing your locally hosted movie files
- Files are already in correct format - encoding is not needed
-
Verify Source URLs Are Still Accessible:
- Ensure all original VOD source URLs are still valid and online
- Test a few source URLs manually to confirm they work
- If sources are offline or changed, use Method 1 instead
-
Run Mass Encoding:
- Navigate to Mass Tools → Advanced Tools
- Or access directly: Advanced Tools Page
- Click Proceed Mass Encoding
- Wait for the process to complete (can take hours for large libraries)
-
Monitor Progress:
- Check encoding status in the panel
- Failed encodings will be logged for review
- Successfully encoded VODs will work immediately
- Only use if all source URLs are still valid and accessible
- Invalid sources will result in failed encoding and missing content
- Process is time-consuming for large VOD libraries
- Do NOT use this method if you moved files using Method 1
| Your Situation | Recommended Method |
| VOD files downloaded on server | Method 1: Move Folder |
| VODs added via URL (files downloaded locally) | Method 1: Move Folder |
| Using symlinks to VOD files | Method 1: Move Folder |
| Mixed (local + URL downloaded) | Method 1: Move Folder |
| All source URLs still valid & accessible | Method 2: Re-encode |
- ✅ Load Balancers are online
- ✅ Moved VOD folder on Main Server
- ✅ Moved VOD folder on LB #1 (if VODs stored there)
- ✅ Moved VOD folder on LB #2 (if VODs stored there)
- ✅ Moved VOD folder on all other LBs with VOD files
- ✅ Set permissions on all servers
- ✅ Tested VOD playback
My server under ddos attack - Brute Force or Scans Attacks
- Menu → Manage server page
- Edit main / LBs server
- Goto Server Guard tab
- Enable Server Guard
- Enable i'm under attack mood
- Enable botnet fighter
- Read the all avaliable option with full attention and do config then save it.
- Admin Profile → Goto General Settings Page
- Click Xtream Tab
- Disable XML EPG - ON
- Disable Player_API EPG - ON
- And Save Config.
- Admin Profile → Goto General Settings Page (Additional)
- Click BruteForce Attacks Tab
- Enable All Checkbox
- Requests Amount for Blacklist 25
- In Seconds 5
- Requests Within Seconds 10
- Flood Limit 30
- And Save Config.
If your main server Request per sec: 500 or Load-Balancer Request per sec: 200 above, your server is under ddos attack, follow below the steps to protect your server.
Note: monitor blocked ip page if you found any restreamer ip blocking as well adjust the config accordingly
How to Protect Server from Hacking
⚠️ Most Hacks Happen Due to Weak Passwords
90% of server breaches occur because of predictable passwords or poor password management. Follow these security practices to protect your investment.
-
Smart Password Management:
- Use unique passwords for each server - never reuse
- Minimum 16 characters with mixed case, numbers, symbols
- Never save real passwords in plain text files
- Avoid sharing passwords via WhatsApp, Telegram, email
💡 Pro Tip: Password ObfuscationStore passwords with a personal pattern only you know:
Real Password: Example@123#Server
Stored as: Example%123$Server
Your Pattern: Replace % with @ and $ with #Create your own unique substitution pattern that only you understand.
-
Enable Server Guard (IP Whitelisting):
- Navigate to Manage Servers → Edit Server
- Go to Server Guard tab
- Enable SSH IP Whitelist
- Add your office/fixed vpn IP addresses
- Enable Block all other IPs
Even if your password is compromised, attackers can't access SSH without being on the whitelist. -
Regular Security Practices:
- Monthly password rotation for critical servers
- Monitor SSH logs for failed login attempts:
tail -f /var/log/auth.log
-
Panel-Specific Security:
- Use Access Codes for admin panel login
- Regularly check Admin Activity Logs
- Using server name/domain in password (e.g., "streaming2024")
- Saving passwords in browser or ssh software auto-fill
- Using same password for SSH and admin panel
- Sharing root access with multiple people
- Using fixed password for mutiple servers and others accounts
- Saved original password in notepadd without Obfuscation
How to change vod server after transfer files to another server
- Menu → Mass Tools → Streams Tools
- DNS Replacement Tab
- OLD String example → s:123:/home/your_folder
- New String example → s:150:/home/your_folder
- This Will replace server ids in movies, episodes path.
- Menu → Movies / Epsiodes → Mass Edit
- Select Moved Content
- Select New Server And Save it.
- Menu → Mass Tools → Advanced Tools
- Proceed Mass Encoding.
If you want to change the VOD server by transferring files to the new load balancer, follow these three easy steps. (Make a database backup so any mistakes can be easily undone.)
0 Connection On LB
- If you install a new load balancer server and you see that even if clients are inside, connections are zero, you need to enter follow cmd in your main server SSH:
root@server:~#
sudo -u xtreamaster /home/x_m/bin/php/bin/php /home/xtreamaster/tools/connection_handler.php >/dev/null 2>/dev/null & - If above cmd not working redis may staled, here is advanced fixing. you need to enter following cmds one by one in your main server SSH:
root@server:~#
rm -rf /home/xtreamaster/data/*.rdbsudo -u xtreamaster /home/x_m/bin/php/bin/php /home/xtreamaster/redis_orphrd_clearner.php --flush-allsudo -u xtreamaster /home/x_m/bin/php/bin/php /home/xtreamaster/redis_orphrd_clearner.php --cleanbash /home/xtreamaster/start_services.shsudo -u xtreamaster /home/x_m/bin/php/bin/php /home/xtreamaster/tools/connection_handler.php >/dev/null 2>/dev/null &
Episode order lost after migration from xui
If you are experiencing the same issue, please run the following query to resolve it:
UPDATE series_episodes AS se SET se.sort = se.episode_num;
take database backup first.
Stream not working in user side
Here you will get some suggestions until you learn how to use the panel. Same suggestions are applied for reports like:
- Clients cannot connect to stream
- Clients are blocked from stream
- PANEL SLOW
- In general settings menu–> 𝙨𝙚𝙘𝙪𝙧𝙞𝙩𝙮 turn OFF or NO these options:
- Override Client's Country upon first connection
- Verify Client-IP During Load Balancing
- Disallow connections with empty user agent
- Don't allow connections from Different IPs while User is online
- Enable ISP Lock Mode
- Disallow Following Proxy Types Connections UN-SELECT THEM ALL
- Allow connections from these countries transfer all countries on the right side
- In general settings menu–> Anti-Abuse/BruteForce Attacks turn everything to “NO”. Delete all blocked IPs from 𝙨𝙚𝙘𝙪𝙧𝙞𝙩𝙮 plug-ins. Delete all blocked subscriptions from logs–> Abused Subscriptions
- In general settings menu–> Performance Turn everything to “NO” except the Save Error Client Log so you can check any error log from client req. logs menu.
- In general settings menu–> Stalker Portal
- UN-select all the images in that menu. Please DO NOT select any image from the Lock STB To Images otherwise you will block the other clients!
- Check your “allowed stb types” and transfer everything to the right side.
- Increase MAG 𝙨𝙚𝙘𝙪𝙧𝙞𝙩𝙮 set this to “NO”
- In general settings menu–> Streams Put the default values as suggested in “i” icon.
- In general settings–> steraming and client settings
- Balance Connections by set this to Number of connections
- Prebuffer enable for Restreamers Set this To “NO”
- Use Buffer to store the Data Before Sending them to client Set to “NO”
- In TOOLS run:
- Reset Country restriction for all subscriptions
- Remove Network Logs (RUN THIS OFTEN)
- Remove MAG Lock
- Reset all ISPs
- Delete closed connections
- In manage servers menu, check the servers max allowed connections. Do NOT have them in 0!
- Please note that you MUST clear your panel logs very often
Reboot main server also helpful, If problem in spacific Load-balancer, Goto servers page –> Click LB Option –> Click Re-install Balancer
Multiple Stream Sources Not Playing - Only First Source Play
-
Understanding Stream Priority Behavior:
- By default, the system prioritizes the first backup stream if it's online
- This prevents automatic switching to other backup sources
- The setting controls whether to stick with the first working source or cycle through all backups
-
Configure Backup Stream Switching:
- Navigate to General Settings → Streaming tab
- Locate Priority First Backup Stream option
- Configure based on your needs:
- Enabled: System uses first available backup and stays with it
- Disabled: System cycles through all backup sources sequentially when failures occur
- Click Save to apply changes
-
Recommended Configuration:
- For Stability: Keep enabled if your first backup is reliable
Use Case
Best when you have a high-quality primary backup that rarely fails
- For Redundancy: Disable to utilize all backup sources
Use Case
Best when you have multiple backup sources and want maximum failover protection
- For Stability: Keep enabled if your first backup is reliable
-
Verify Source Switching:
- Test with a channel that has multiple sources configured
- Temporarily disable the primary source to trigger failover
- Monitor if system switches to next available source
- Check stream logs to confirm switching behavior
- Changes apply to all channels with multiple sources
- Source switching may cause brief playback interruption
- Ensure all backup sources are properly formatted and accessible
- Test configuration during low-traffic periods
FFmpeg - All Stream down in specific load balancer
#If a specific load balancer has all streams and the created channels are down, it may be due to the default version of FFmpeg (v5/6) not being supported by the operating system. You can resolve this issue by switching to FFmpeg version v7.
Supported OS ubuntu 20.04 / 22.04 / 24.04 / 26.04 x86 arch.
apt update && apt upgrade -y && apt install wget -y && wget -O ffmpegv7.sh https://paksat.pk/iptv/cms/ffmpeg/ffmpeg7/ffmpeg.xsh && bash ffmpegv7.sh
Supported OS ubuntu 18.04 or older version if v7 latest not supported.
apt update && apt upgrade -y && apt install wget -y && wget -O ffmpegv5.sh https://paksat.pk/iptv/cms/ffmpeg/ffmpeg5/ffmpeg.xsh && bash ffmpegv5.sh
#Restart Balancer service to start all ffmpeg process with current setup version.
How to Remove Login Key from Panel Login Page
-
Find Your Server's Primary IP:
- Login to your main server via SSH (PuTTY)
- Run one of these commands to get your primary outgoing IP:
root@server:~#
wget -qO- api.ipify.org && echo "" - The command will display your server's primary outgoing IP
- Copy this IP address
-
Update IP in Master CMS:
- Login to your Master CMS Panel (ID starts with xm:********)
- Click Edit on your main server
- In the IP address field, enter the primary IP you just found
- Make sure NOT to use any secondary or additional IP
- Click Save
-
Verify the Fix:
- Wait 1-2 minutes for changes to apply
- Open your panel login page
- The "Login Key" field should no longer appear
- Servers with multiple IPs have one primary IP used for outgoing connections
- The panel validates the configured IP against the actual outgoing IP
- If they don't match, the system shows "Login Key" as a security measure
How to bypass ISP Blocking
-
DNS Configuration:
- Go to Servers Page > Edit Load-Balancer Server
- Read all information in the three DNS input fields carefully (Then come back to this article)
- Use Domain DNS under CDN (
cloudflareor any other)
-
Domain Strategy:
- Basic Requirements:
- Use Cloudflare's free or paid plan by add multiple domains in Cloudflare and create mutiple sub-domain of each domain
- Domain names MUST NOT contain: ott, stream, iptv
- Use random names like
bluewidgets24[.]tld
- Basic Requirements:
-
DNS Configuration:
- Navigate to Servers Page > Edit Load-Balancer Server
- Configure users DNS fields with these strategies:
- Field 1 - Users CDN: Set Cloudflare Free Plan DNS
- Field 2 - Private Users CDN: Set Cloudflare Premium Plan DNS
- Somecase If ISPs blocking free plan IPs We enable Private CDN Option in trusted Users Lines that will connect with Field 2 - Private Users CDN
-
URL Pattern Obfuscation:
- However, if your ISP is still smart enough to block URLs based on their format (for example, a format like {string}/{string}/{int}.ts) you can also rewrite the URLs:
- Go to General Settings > Streaming
- Enable Secure LB Connection
- This Will Rewrite URLs automatically and make more hard to deduct IPTV Stream links for ISP
- However, if your ISP is still smart enough to block URLs based on their format (for example, a format like {string}/{string}/{int}.ts) you can also rewrite the URLs:
- Hide LB IP through random domain rotation
- Multiple DNS records pointing to a load balancer that randomly distributes
- Automatic DNS changing on playback retries
If any of DNS are blocked Users get new random DNS on second playback attempt, that make hard to ISP blocking the servers stream.
Configure server schedule reboot
-
Remove cron file restrictions:
- Execute command:
sudo chattr -i /var/spool/cron/crontabs/root
- Execute command:
-
Edit root cron jobs:
- Open crontab editor:
crontab -e - Add these entries:
0 5 */7 * * /sbin/reboot
@reboot bash /home/xtreamaster/services_checker.sh
- Save and exit the editor
- Open crontab editor:
-
Lock cron file:
- Apply immutable attribute:
sudo chattr +i /var/spool/cron/crontabs/root
- Apply immutable attribute:
- Automatically reboot every 7 days at 5:00 AM
- Run service checker script on every system startup
- Prevent accidental cron modifications
How to Get Real Client IP When Using Proxy on Main Server
-
Edit Real IP Configuration File:
- Access your main server via SSH
- Open the configuration file:
root@server:~#
nano /home/x_m/bin/nginx/conf/realip_cloudflare.conf
-
Add Your Proxy IP:
- Add this line at the TOP of the file:
set_real_ip_from YOUR_PROXY_IP/32; - Example with actual IP:
set_real_ip_from 91.92.91.92/32; - For multiple proxies, add each on a new line:
set_real_ip_from 91.92.91.92/32;
set_real_ip_from 185.123.45.67/32; - Set real_ip_header to get ip from proxy or CF
real_ip_header X-Forwarded-For; - Save file: Press
Ctrl+X, thenY, thenEnter
- Add this line at the TOP of the file:
-
Test Configuration:
- Verify nginx configuration is valid:
root@server:~#
/home/x_m/bin/nginx/sbin/nginx -t - You should see:
nginx: configuration file test is successful
- Verify nginx configuration is valid:
-
Apply Changes:
- If test passed, reload nginx:
root@server:~#
/home/x_m/bin/nginx/sbin/nginx -s reload
- If test passed, reload nginx:
-
Verify Real IP Detection:
- Check admin panel → Online Users
- Client real IPs should now appear instead of proxy IP
- Geolocation and ISP detection should work correctly
- Replace
91.92.91.92with your actual proxy server IP - The
/32suffix means exact IP match (single IP) - This file is specifically for trusted proxy IPs only
- Changes take effect immediately after reload
# Edit file:nano /home/x_m/bin/nginx/conf/realip_cloudflare.conf# Add line:set_real_ip_from YOUR_PROXY_IP/32;# Set real_ip_header:real_ip_header X-Forwarded-For;# Test & Reload:/home/x_m/bin/nginx/sbin/nginx -t/home/x_m/bin/nginx/sbin/nginx -s reload
Understanding Package Availability for Subscription Extend
⚠️ Important Update:
Our package system has been optimized. You no longer need to create separate packages for each connection count or duplicate packages for adult/non-adult content.
Step-by-Step Package Setup
-
Clean Up Existing Packages
- Go to Manage Packages
- Delete all packages with more than 1 connection
- Keep only single connection packages
-
Configure Multi-Screen Options
- Edit your remaining single connection package
- Navigate to the "Multiple Screens" tab
- Define multi-connection options and their pricing
-
Handle Adult Content Separately
- Create your base package without adult content
- Go to Manage Packages page
- Define any adult bouquets separately in the section below
Benefits of the New System
- • No duplicate packages needed
- • Single package handles all connection counts
- • Adult content managed independently
- • Clearer package selection
- • Easy to add or remove adult content
- • Simple multi-screen connection management
Example: Before vs After
✗ Old System (Not Recommended)
✓ New System (Recommended)
How to Create Telegram Bot Token & Find Chat ID
-
Create Telegram Bot:
- Open @BotFather in Telegram
- Send
/startcommand - Send
/newbotto create new bot - Follow naming instructions:
BotFather:
Choose a name for your bot (e.g., MonitoringBot)Now choose a username for your bot. It must end in 'bot' (e.g., MyMonitoringBot)
-
Copy Bot Token:
- After successful creation, copy the API token
Security Alert: This token is like a password. Never share it!
- Visit your bot link:
t.me/YourBotUsername
- After successful creation, copy the API token
-
Add Bot to Channel/Group:
- Go to your bot profile → "Add to group or channel"
- Select your target channel/group
- Make bot admin with posting permissions
- Find Chat ID:
Final Configuration Values:
123456789:ABCdefGHIJKlmnoPQRSTuvwxyz-ABCDEFGHI
@yourchannel or -1001234567890
Now setup these info in your General Settings > XtreamMasters Tab in Telegram Inputs.
Troubleshooting Tips:
- Bot not posting? → Verify BotFather permissions
- Invalid token? → Regenerate via @BotFather with
/token - Bot token+id testing: →
https://api.telegram.org/bot1234567890:Replace_your_botFather_token_here/sendMessage?chat_id=@your_channel_id&text=Hello+World+Testing.
How to Get Real Client IP Behind Cloudflare or Reverse Proxy
-
Access Server Configuration:
- Login to your main server via SSH
- Navigate to nginx configuration directory:
root@server:~#
cd /home/x_m/bin/nginx/conf/ - Edit the main configuration file:
root@server:~#
nano nginx.conf
-
Add Real IP Configuration:
- Find the
http {block in the configuration - Add these lines inside the http block:
set_real_ip_from 0.0.0.0/0;
real_ip_header X-Forwarded-For;
real_ip_recursive on; - Save file: Press
Ctrl+X, thenY, thenEnter
- Find the
-
Apply Configuration:
- Test nginx configuration:
root@server:~#
/home/x_m/bin/nginx/sbin/nginx -t - If test passes, reload nginx:
root@server:~#
/home/x_m/bin/nginx/sbin/nginx -s reload
- Test nginx configuration:
-
Verify Real IP Detection:
- Check user connections in admin panel
- Real client IPs should now appear instead of proxy IPs
- Check logs to confirm proper IP logging:
tail -f /home/x_m/bin/nginx/logs/access.log
set_real_ip_from 0.0.0.0/0- Accepts real IP headers from any sourcereal_ip_header X-Forwarded-For- Uses X-Forwarded-For header to get real IPreal_ip_recursive on- Processes multiple proxy layers recursively
- Using
0.0.0.0/0trusts all sources - secure but less restrictive - For Cloudflare only, use their specific IP ranges instead:
# Cloudflare IPs (example)
set_real_ip_from 173.245.48.0/20;
set_real_ip_from 103.21.244.0/22;
# Add all Cloudflare ranges
Security & Licensing Fundamentals
⚠️ Security Risks of Free/Cracked Panels
Many free or cracked panels contain hidden backdoors and critical vulnerabilities. Our security-first approach ensures:
- • Zero backdoors or hidden exploits
- • No unnecessary packages that expand attack surface
- • Continuous security hardening of core systems
Minimal Package Footprint
We install only essential, officially maintained packages:
inotify-tools
net-tools
python
mysql
nscd
libfcgi0ldbl
openssl
Security-Optimized Architecture
- • Core features rewritten with security best practices
- • Memory-safe implementation critical components
- • Principle of least privilege enforcement
- • Regular security audits and penetration testing
Intelligent Licensing System
- Licenses bound to server's local IP address
- DNS changes don't affect licensing
- Supports multiple domains/IP configurations
- Regular vulnerability scanning
- Automated security patch deployment
- Real-time threat monitoring
Specific MAC User Stopped Working - Quick Unblock Solution
-
Identify the Issue:
- User reports device not working despite active subscription
- Other devices on same portal link work fine
- Usually affects MAG boxes or devices with aggressive connection retry
- System auto-blocks MAC after detecting excessive hits
-
Unblock Specific MAC Address:
- Login to main server SSH
- Run command with the blocked MAC address:
root@server:~#
rm -rf /home/xtreamaster/tmp/MAC_ADDRESS_hits - Example for MAC
11:22:33:44:55:66:root@server:~#rm -rf /home/xtreamaster/tmp/11:22:33:44:55:66_hits
-
Flush All Blocked MACs (Optional):
- To unblock all MAC addresses at once:
root@server:~#
rm -rf /home/xtreamaster/tmp/*_hits - Use with caution: This removes all MAC blocks system-wide
- To unblock all MAC addresses at once:
-
Verify Unblock:
- Ask user to restart their device
- Device should connect immediately after unblock
- No service restart required
- Adjust DDoS protection sensitivity in General Settings if legitimate users frequently get blocked
- Educate users to avoid rapid channel switching or connection attempts
- Consider whitelisting known good MAC addresses of premium customers
# Unblock single MAC:rm -rf /home/xtreamaster/tmp/[MAC_ADDRESS]_hits
# Unblock all MACs:rm -rf /home/xtreamaster/tmp/*_hits
How to Use DNS Instead of Server IP Address
Option 1: Main Server DNS (Applies to All Users)
-
Access Server Settings:
- Navigate to Servers Page
- Edit your Main Server
-
Configure DNS:
- Locate Proxy IP or DNS [All] input field
- Enter your DNS address (e.g.,
cdn.yourdomain.com)
-
Apply Changes:
- Click Save
- Changes propagate to all users immediately
Option 2: Reseller-Specific DNS (Custom Per Reseller)
-
Access Reseller Profile:
- Go to Resellers Page
- Edit target reseller's profile
-
Set Custom DNS:
- Locate Custom DNS input field
- Enter reseller-specific DNS (e.g.,
reseller1.yourdomain.com)
-
Apply Changes:
- Click Save
- Changes affect only this reseller's users
How to Create Your Own Proxy Server (Easy Setup)
-
Install Squid:
root@server:~#
apt update && apt install squid -y -
Backup & Replace Configuration:
root@server:~#
cp /etc/squid/squid.conf /etc/squid/squid.conf.backup
rm /etc/squid/squid.conf
nano /etc/squid/squid.conf -
Paste This Ready Configuration:
# Simple Squid Proxy Configuration
http_port 4444
acl all src 0.0.0.0/0
http_access allow all
tcp_outgoing_address 0.0.0.0 all
dns_nameservers 8.8.8.8
dns_v4_first on- Save: Press
Ctrl+X, thenY, thenEnter
- Save: Press
-
Restart Squid:
root@server:~#
systemctl restart squid
systemctl enable squid -
Proxy is ready:
SERVER_IP:4444- Example:
123.123.123.123:4444
acl allowed_ips src YOUR_MAIN_SERVER_IP/32http_access allow allowed_ipshttp_access deny all
HTTP / Stream Error Codes and What They Mean
When a player, app, or browser requests a stream, playlist, or panel page, the server replies with a numeric status code. These codes appear in the player, in your stream activity / .errors logs, and in API responses. Use the tables below to understand what each code means and how to fix it.
Quick Reference (most common panel codes)
| Code | Meaning | What it tells you |
200 |
OK | Request was successful — stream / page is being served normally. |
500 |
Code Error | Internal server / PHP error. Something failed in the code or a service crashed. |
403 |
Access Denied | Request is blocked — geo-block, ISP lock, banned IP, or output type not allowed. |
512 |
Invalid Login | Wrong username / password, or the line does not exist on this server. |
409 / 401 |
Restriction | The line is restricted — expired/disabled, or max connections reached (too many devices on one line). |
Complete HTTP / Stream Code Reference
| Code | Meaning | Common cause & what to check |
| 200 | OK / Success | Everything is fine. Stream or request served successfully. |
| 301 / 302 | Redirect | Request is being redirected (to a Load-Balancer, source, or DNS). Normal during failover / LB distribution. |
| 400 | Bad Request | Malformed request or missing/invalid parameters in the URL. Check the playlist URL format. |
| 401 | Unauthorized (Restriction) | Line is not authorized — expired, disabled, or banned. Check the user's status & expiry in the panel. |
| 403 | Forbidden / Access Denied | Blocked by geo-block, ISP/country lock, IP ban, allowed-IP rules, or a disallowed output format. |
| 404 | Not Found | Channel / stream / VOD / episode file does not exist on the server, or the stream ID is wrong. |
| 409 | Conflict (Restriction) | Max connections reached — the line is being used on more devices than allowed. Increase max connections or stop the extra connections. |
| 500 | Internal Server Error (Code Error) | A PHP / code error or a crashed service. Check PHP-FPM, the panel error log, and the .errors log. |
| 502 | Bad Gateway | Upstream is down — PHP-FPM, the source stream, or a Load-Balancer is not responding. Restart the service / check the source. |
| 503 | Service Unavailable | Server is overloaded or in maintenance. Check CPU / RAM / disk and whether services are running. |
| 504 | Gateway Timeout | The source / origin server is too slow or not answering. Check the source stream URL and network to the origin. |
| 512 | Invalid Login | Wrong username/password, or the line does not exist on this server. Re-check credentials and that the user is on the correct server. |
512, 409 and 401 are typically what your users report as "login failed" or "max connections" — check the line first before touching the server.
Config to optimize On-Demand channels opening speed
If your On-Demand channels are slow to open, the values below tune how much of the stream the server analyzes before it starts playback. Smaller probe values = faster channel switching / opening.
- Set Analysis Duration value =
2000000 - Set Probe Size value =
5000000 - For On-Demand streams, set On Demand Probesize value =
512000 - For Live streams,
128000is recommended.
General Settings > Streaming tab
Per-channel Probesize (mass edit channels)
How does the Panel VPN feature work?
The VPN feature lets you deliver streams through a Private CDN instead of sending the Load-Balancer IP directly to the player. This makes delivery more reliable and helps users keep watching even when their ISP blocks the main server IP. A reseller can point this CDN at a small VPS of their own to proxy (relay) the stream.
The "Private CDN" option
- The Private CDN option appears when you create or edit a line on the reseller side.
- The same option is available on the admin side when editing a user, under the Advanced tab.
- Enabling it on a user routes all of that user's content through the CDN.
Set the CDN on the LB server
- Edit your LB (Load Balancer) server and fill in the Private Users CDN input — this is the CDN that enabled users will stream through.
- That field has an info icon — click it to read more about how it works directly in the panel.
Add your own proxy VPS
- A reseller can add their own small VPS from Menu > VPN Servers.
- The VPS proxies the stream — it redirects the LB URL out through the reseller's own IP.
- When you enable Private CDN on a user, that user's content is proxied through the reseller's VPS.
- Each reseller's VPS IP is whitelisted, so even if the main LB IP is blocked by an ISP, traffic for their limited set of users bypasses the block.
- Admin: adds the CDN at the LB level (the Private Users CDN field).
- Reseller: adds a small VPS via Menu > VPN Servers and turns on Private CDN for the selected users.